
Propane: Now we’re cooking with gas!
There are some major milestones that make the tiny house feel like a home. The plumbing, eating area, couch, and kitchen are some of those milestones. However, having propane to heat water and cook takes that feeling to the next level.
I’ve certainly enjoyed the many do-it-yourself projects in this tiny house. My goal is to do as much as possible with my father and my own two hands. However, like the split-system there are some tasks that I’ll leave to the professionals. Installing propane is one of them. Fortunately, the company that installed the split-system also installs propane systems. Although, I certainly did not sit idly by. I wanted to be involved and learn about the process and ask questions.
Why Propane?
There are many ways to cook and heat water. You can use propane, natural gas, electricity, solar, or a wood burning stove. There are pluses and minuses to each option, and deciding which one to use needs careful consideration.
Propane is portable, and tanks are available in many places. The drawback of propane is that tanks must be replaced, and it is possible that there isn’t any available. However, it is easy to swap tanks, and then quickly start cooking and heating water within minutes.
Electricity works well as the appliances are always available when there is power. However, if the grid goes down or the batteries in the solar system are low, then hot water and cooking aren’t available. Secondly, heating water and cooking food requires a lot of energy. This means more solar panels, larger batteries, or reliance on the grid to supply power.
A wood burning stove uses an abundant resource that can be found on the ground in most forests. However, gathering wood and starting the stove takes time. Furthermore, heating large quantities of water like for bathing isn’t practical. Although, cooking with an open flame or on top of a stove is feasible once the stove is burning well.
From these options, I will use propane. Other than its ease of use, I am trying to keep electricity usage as low as possible since I want to install a solar system. With that said, nothing says success like a good plan.
Planning the Propane Installation
Even though I hired professionals to do the installation, I wanted to set expectations and answer any questions ahead of time. After the initial appointment, I put together a set of slides that showed roughly the layout of the propane tanks, the hook-ups, and where the pipes would go in and out of the tiny house.
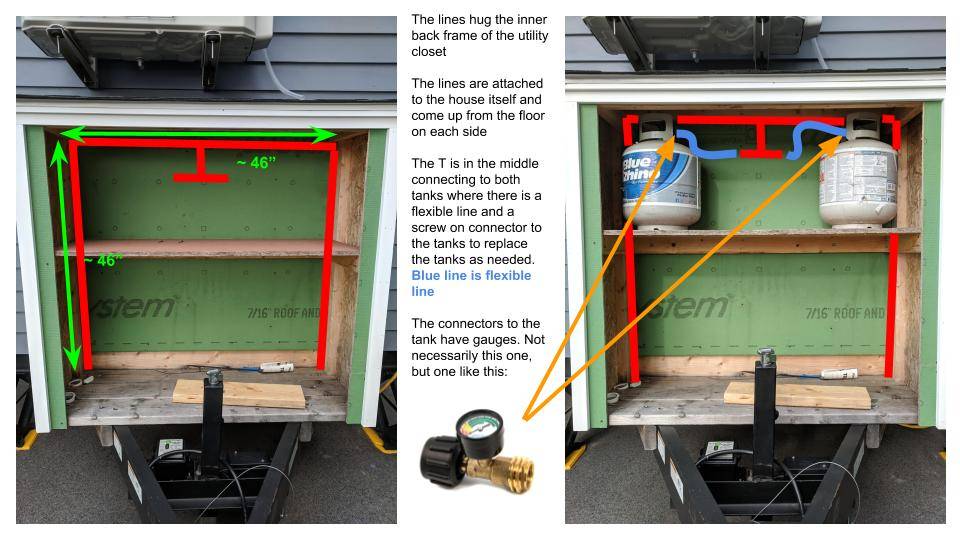
The plan places the pipes against the house to help keep the pipes as warm as possible in the winter. I don’t know whether this actually works or not, however, it seems like a good idea. The reaction I get when I ask around about this is either a shoulder shrug or a meh.
But first, let’s finish the Utility Closet
While putting the plan together, I realized the utility closet needed a bit of work (more like a lot of work). In order to finish it, there was work to be done on the door, locking mechanisms, and a coat of paint.

Originally, the door would swing outward like french doors. However, it became clear that the crank which lowers and raises the tongue is in the way. With no easy way to have a swinging door, the solution is to have a removable one. The only drawback to a removable door is the weight. This door weighs approximately 40 lbs (~ 18 kg).
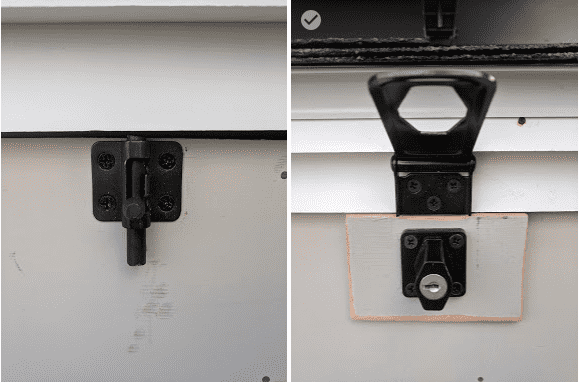
The locking mechanisms at the top secures the door with a key lock and two slide latches. The bottom has two guides that hold the door against the base of the utility closet. First, slide the bottom of the door behind the guides, then push the door in place at the top. Lastly, slide the latches up and lock the cabinet. That’s it!
The last step is painting. The inside and outside of the utility closet are the same color as the exterior. The black hardware for the locks and handles looks great against the white trim and gray siding.
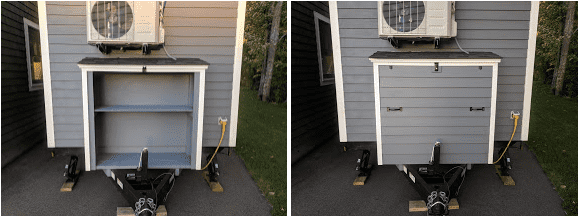
Now that’s a utility closet worthy to secure the propane tanks! Currently, the bottom shelf is open. It is storage for now. However, I intend to use it for solar components in the future.
Installing the Propane Lines
With the utility closet ready, the professionals can proceed with the install. In all, the pre-installation slides and the end installation are spot on. The lines come out of the tiny house on each side and follow the trailer until the utility closet. Next, the lines come up from underneath the utility closet floor, hug the wall of the tiny house, and then come into the regulator. There are two tanks that feed propane throughout the house.

The regulator between the tanks in the utility closet controls the flow of propane to the two appliances. The cooktop is capable of using 31,000 BTUs when every burner is on. Therefore, the 3/8″ pipe installed when the kitchen was built can sufficiently supply enough propane to all burners at once.
The propane water heater, a Takagi Indoor Tankless Propane Water Heater, is hidden in the wall next to the sink. When hiding a propane water heater, it’s important to abide by the minimum space requirements around it. So far, I like this unit. It heats water quickly, and it is very quiet. In fact, it makes less noise than the water pump under the sink.
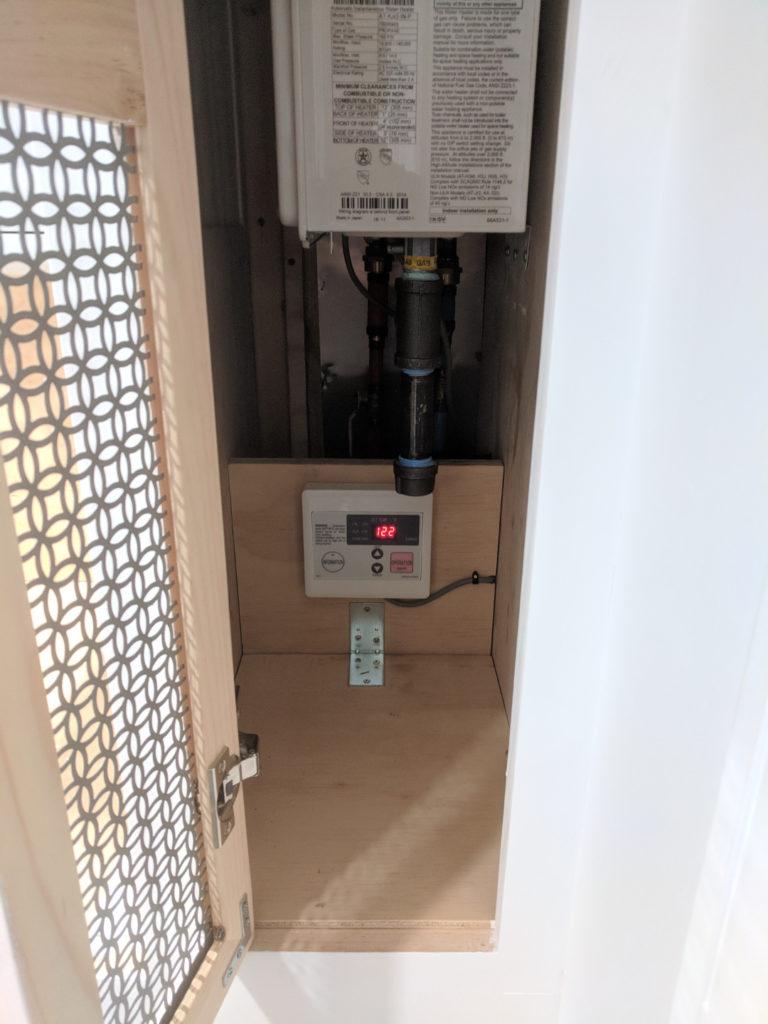
The temperature control for the hot water is located below the heater. It’s easy to control the temperature by pushing the keypad up or down. Currently, the water is set to 122F (50C).
Conclusion
Planning ahead helped answer questions and established a game plan prior to the installation. Without it, on the fly decisions could have caused problems down the road. Because of good planning, the installation was smooth and the professionals did a great job answering all my questions. The entire install was completed in 6 hours.
Now, I have the capabilities to cook food and heat water. Not only can I make meals, I can take a hot shower. However, I’ll need to learn how to take shorter showers when using the water reserve tank. That will take some practice.